
Getting a new computer is the second most common reason Melbourne households call us about printer problems (the first is printers showing offline on existing computers — see our printer offline guide). The printer was working perfectly before. Now the new computer either can’t find it, says the driver isn’t installed, or finds it but the scanner function doesn’t work. This guide explains exactly what’s happening and how to fix it — starting with the key distinction between Wi-Fi and USB printers, which have completely different setup processes.
Why the printer doesn’t automatically connect to a new computer
On your old computer, the printer worked because it had been through a setup process — driver installation, network configuration, and registration with Windows — at some point in the past. That setup doesn’t transfer to a new computer automatically. The new computer has never met your printer before.
The Windows 11 auto-driver problem: Windows 11 often detects a printer automatically when you plug in a USB cable or when it discovers a printer on the Wi-Fi network — and installs a basic driver without asking. The problem is that this automatic “basic” driver only enables printing. It doesn’t install the manufacturer’s full-feature driver, which means the scanner doesn’t work, ink levels don’t display, and features like duplex printing or colour calibration aren’t available.
If Windows installed a driver automatically and printing works but the scanner doesn’t — this is almost certainly why. The fix is installing the full-feature driver from the manufacturer’s website, which replaces the basic one. Instructions by brand are below.
Wi-Fi printer: how to connect to a new computer
A Wi-Fi printer doesn’t need to be reconnected to the Wi-Fi network when you get a new computer — it’s already connected to your home network independently. What changes is that the new computer needs to find the printer on the network and install the correct driver for it. These are two separate steps that people often confuse.
Wi-Fi printer setup on a new Windows 11 computer:
- Make sure the printer is turned on and connected to your home Wi-Fi (check that the Wi-Fi light is on and not flashing)
- On the new computer: Settings → Bluetooth & devices → Printers & scanners → Add device
- Windows will scan the network — your printer should appear after 30–60 seconds. If it does: click on it and click Add device. Windows will install a basic driver automatically.
- Stop here and see the “brand drivers” section below — the basic driver Windows installs often doesn’t include scanner functionality. Install the full driver from the manufacturer’s website to get everything working properly.
Printer not appearing in the scan? The most common causes: the printer and computer are on different Wi-Fi networks (check the printer’s network settings on its display), or the printer has been assigned a new IP address after a router restart. Try turning the printer off and back on — this prompts it to broadcast its presence on the network again. If still not appearing, see our wireless printer setup guide.
USB printer: how to connect to a new computer
USB printers are simpler in one way — no network required — but require the driver to be installed before or at the moment of connecting. Plugging in without a driver often results in Windows either not recognising the printer at all, or installing a basic driver that only partially works.
USB printer setup on a new Windows 11 computer — the right order:
- Do not plug in the USB cable yet. Most manufacturer installers ask you to connect the cable at a specific step — connecting before installing often causes driver conflicts.
- Download the full-feature driver from your printer manufacturer’s website (links in the brand section below)
- Run the installer — it will guide you through the setup and tell you when to connect the USB cable
- When prompted, plug the USB cable from the printer into the new computer
- Complete the installer and run a test print
Already plugged it in and something went wrong? Go to Settings → Bluetooth & devices → Printers & scanners, remove any entry for your printer that appeared, then unplug the USB cable. Wait 30 seconds, then start from Step 2 above.
Where to download the correct driver — by brand
Always download the full-feature driver package — not just the “print driver” or “basic driver.” The full package includes the scanner driver, ink management software, and all features of your specific printer model. Never download printer drivers from third-party sites — only from the manufacturer’s official website.
| Brand | Official driver download page | What to download |
|---|---|---|
| HP | support.hp.com → search your model | HP Smart app (modern printers) or Full Feature Software and Drivers (older models) |
| Canon | canon.com.au/support → search model | MP Drivers + IJ Scan Utility package — both must be installed for scanner to work |
| Epson | epson.com.au/support → search model | Epson Scan 2 + Epson Event Manager (if you use the Scan button) + print driver |
| Brother | support.brother.com.au → search model | Full Driver & Software Package — includes ControlCenter4 and all features in one download |
Finding your model number: It’s printed on a sticker on the front, back, or underside of the printer. For HP it usually starts with letters (HP DeskJet 2720, HP OfficeJet Pro 9020). For Canon it’s a number/letter combination (PIXMA MG3060). Have this ready before going to the support website. If you can’t find the model number, the manufacturer’s website usually has a “detect my printer” option that identifies it automatically.
Scanner not working after setup — even when printing works
As mentioned earlier, this is the most common post-setup issue. Printing and scanning use separate drivers. Windows auto-installs a print driver; the scan driver usually needs to be installed separately or via the full manufacturer package.
If printing works but scanning doesn’t after connecting a printer to a new computer:
Older printer — no Windows 11 driver available
If your printer is 7+ years old, the manufacturer may not have released a Windows 11 driver. This doesn’t necessarily mean the printer is finished — there are two options most people don’t know about:
Option 1: Windows Update driver channel
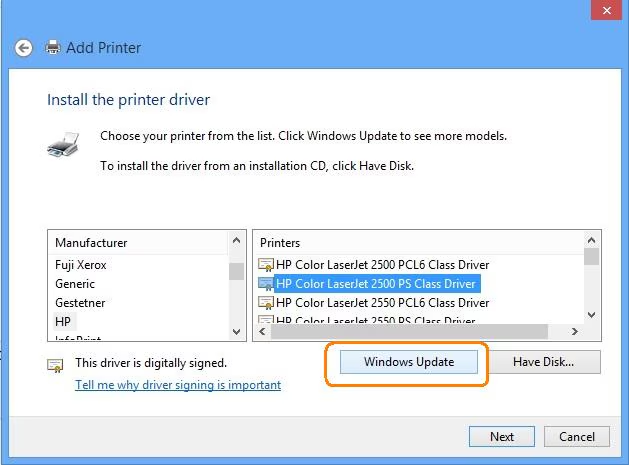
Microsoft maintains a library of older printer drivers through Windows Update — some manufacturers submit drivers here even when they’re no longer on the brand’s own website. Go to Settings → Bluetooth & devices → Printers & scanners → Add a printer or scanner → if your printer appears but shows “Driver unavailable,” click it → Add device → Windows will attempt to download a compatible driver via Windows Update. This works for many printers that are otherwise considered “unsupported.”
Option 2: Use the printer as a basic print-only device
Even without a full driver, most older printers can still print basic documents using Windows’ built-in generic PCL driver. Scanning won’t work, and features like ink levels and colour profiles won’t be available — but for printing letters, forms, and documents, the generic driver often works fine. In the Add Printer wizard, select “The printer I want isn’t listed” → “Add a local printer” → use an existing port → choose a Generic / Text Only or PCL driver from the list.
Frequently asked questions
Yes — driver installations are specific to the computer they’re installed on. The new computer has no record of your printer’s previous setup. The good news is that reinstalling is usually quick (10–15 minutes) once you have the correct driver from the manufacturer’s website. We handle this as part of any new computer setup visit.
Windows auto-setup installs a basic print driver only — the scan driver requires the manufacturer’s full software package. Download and install the full package from the brand’s support website (links above). This replaces the basic driver with the complete set of features including scanning. See our scanner not working guide if the scanner still doesn’t work after installing the full driver.
Not necessarily. Try the Windows Update driver channel first (Settings → Printers → Add device). Many older printers have a driver available through Windows Update that doesn’t appear on the manufacturer’s website. For HP printers specifically, the HP Print and Scan Doctor tool sometimes finds compatible drivers automatically. If scanning is essential and no driver exists, it may be time to consider replacing just the printer — modern all-in-one printers with good Windows 11 support start from around $80–$150.
Yes — a Wi-Fi printer can be used by multiple computers on the same home network simultaneously. Each computer needs its own driver installed, but the printer itself only needs to be connected to the Wi-Fi network once. USB printers can only be directly connected to one computer at a time (via the cable), though they can be shared over a network using Windows printer sharing. For most Melbourne homes, a Wi-Fi printer is the easier option for multi-device households.
Yes — printer connection is included as part of our new computer setup service or available as a standalone visit. We install the correct full-feature driver for your specific model (HP, Canon, Epson, or Brother), configure both printing and scanning, test everything before leaving, and also check for the blank page and offline issues that often appear together. $89/hr, no call-out fee, all Melbourne suburbs. Call 0435 955 429 to book.
Printer not connecting to the new computer?
We come to your home, install the correct full-feature driver, get printing and scanning working properly, and test everything before leaving. $89/hr, no call-out fee, all Melbourne suburbs.
Related guides
Serving all Melbourne suburbs — Doncaster, Camberwell, Box Hill, Glen Waverley, Kew, Hawthorn, Balwyn, Ringwood and all surrounding areas. View all service areas →
About Fixable: Friendly, patient on-site IT support across all Melbourne suburbs — printers, computers, Wi-Fi and more. Always in plain English. Call 0435 955 429 or visit fixable.au